Over at the CMB one of the swaps I'm in is a secret sister "Bashful Bunny Swap." In the course of getting to know each other through 2 swaps now we decided to do a blog hop with Easter projects. If you came here from
Scrap Occurs, you are in the right spot! If you came to my page and have no idea what I'm talking about, start
here. There are lots of wonderful projects and even some
Blog Candy on many blogs (including here!).
On to the project! I got this idea from one of my
favorite sites. It is the coolest (and super easy!) way to dye eggs. One of the reasons I love it because my 2 year old can help and we don't have egg dye all over the table, chairs, floor, clothes, etc...Here we go:
First off, you'll need eggs (do I really even need to say that?) and silk ties. Yes, ties. Men's silk neck ties. You can get them for about $1 at Savers, GoodWill, Salvation Army or wherever. If the hubby has some ugly ones, just grab those ask if he minds that you use them. Just make sure that they are 100% silk (there should be a tag and surprisingly, most ties are silk) - other fabrics don't give up their color as well.
Once you have your ties, cut the seam in the back and pull out the white interfacing stuff. This is the most tedious part. Especially if you are like me and decided that if 10 ties is good, 30 is better...
 |
| A pile of my ties all cut up |
Once you have all your ties cut up, wrap them around your eggs. You'll want the "right" side toward the egg (the side that was showing when your ties were still ties and not just a pile of fabric). Get the fabric nice and tight around the egg so you don't have many gaps. If the fabric isn't touching the egg, the color won't transfer. You can secure the fabric around the egg with string or even just a twist tie.
 |
| Seriously. How cute is this?? |
After that, you'll want to cover them in a light colored
cotton fabric. (I just cut up an old pillowcase and used that). Then put them in a large pot, cover the eggs with water. Then comes the magic - add 1/4 cup vinegar and boil for 20 minutes. This will both hard boil your eggs and dye them at the same time.
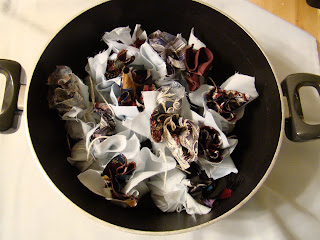 |
| I have to say it's a little weird putting fabric on the stove... |
Then when they are all done, you get to unwrap them like little presents (after they cool of course - not that I would have tried before that or anything...) and this is what you get:
Here are some pics of the eggs on top of the tie they were wrapped in. How you wrap it will depend on where you get the "bunched" pattern.
 |
| This one didn't turn out as cool as I thought it would. |
 |
I thought this one was cool because I didn't even notice
the texture of the tie until it was on the egg |
 |
| My favorite one. This was the "bunched" side (where the tie was tied) |
 |
| This was the other side of the above egg. |
 |
Another one I thought would be better. Still neat looking though.
The white splotches are a good example of what happens if the fabric isn't
tight around the egg. |
 |
| All together in a cute basket! |
You can also blow out the eggs before you boil them so they last longer. But since they'll float when you boil them you just need to put a colander on top to keep them in the water. If you make them this way then you can do stuff like make cute ornaments out of them and hang them from an easter tree.
Now for the blog candy! If you want to be entered for the blog candy, all you have to do is leave a comment below. For another entry, follow this blog and leave a comment saying you are a follower. And, lastly, if you are one of my fellow Bashful Bunnies, add a comment below saying that for a third entry. Here is a pic of what you can win:
 |
2 packs of Cosmo Cricket Tiny Type and 1
pad of Studio 112 tags |
Here's the full list:


