Saturday, September 3, 2011

Computer bits!

Who knew all the fun you could have with an old, dead computer?! When my old laptop died I figured I'd keep it since I saw all sorts of fun stuff people were doing on Etsy with computer parts and I wanted to see what I could do. After a year of storing the thing, I finally got around to taking it apart. Let me tell you, it's more difficult than you think - it's almost like they don't *want* you do take it apart...But, totally worth it!

So far I've only made things with the small bits. For the bigger bits (motherboard, bigger circuit boards, etc) I'm still trying to figure out something that won't just look like "Hey! Look! I glued a motherboard to a notebook!" Also, I'm trying to figure out how to safely cut those pieces apart. I would like to avoid toxic fumes and flying projectile...but hey, that's just me.

So, what can you make with computer bits? Well, here's what I've come up with so far. And now that I've started, I really want about 5 more computers to take apart. It's a disease...

(I will say, the colors are much more vibrant in real life. It's rainy here so getting good lighting is a bit challenging).

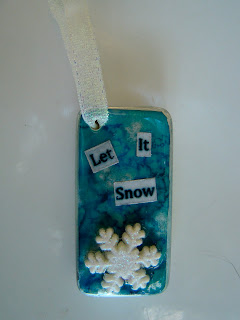
For these first pictures, I altered some dominoes with the computer pieces. I haven't decided if they're going to be necklaces, magnets or keychains yet.


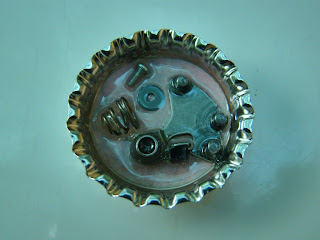
Then I thought to myself "Hey! What about bottlecap magnets?"


Then I thought "Sweet Jesus there are a lot of screws in here! What should I do with them??"


Kinda makes you all happy looking at them all together, doesn't it?

When I got tired of making those, I moved on to a notebook. I took an old pair of jeans and covered the notebook with them, then used the computer fan and some extra wires. And of course the fan still spins! 

Tuesday, August 16, 2011

Altered dominos

Yikes! It's been a while since I've posted anything! Sorry about that...The summer has been a little crazy. But I do have a new obsession that I want to share with you: Altered dominos. Yes - dominos. The game that we all had when we were little yet only 1 person I knew actually knew how to play the game. So, I took those game pieces and doctored them up.
My mom, sister and I spent an afternoon making these and had a blast. They are fairly quick to make and super versatile. They can be jewelry, magnets, Christmas ornaments, keychains, scrapbook embellishments, anything really.

Necklace for my Grandma
Necklace for my niece (A is her initial)
Necklace for my other niece
A keychain
Christmas ornament
This one is going to be a necklace once
I add the findings
Some magnets for my mother in law. I got the mini
domino in the dollar section of Target
Another magnet
Another mini magnet
You can use alcohol inks, copics, sharpies, Gold/Silver/Copper leafing pens, StayzOn ink. Almost anything really. The ones below I used alcohol ink, jewelry and scrapbooking embellishments and leafing pens on them. When I had them how I wanted them I sealed it all in with Glossy Accents. Hope you like them! 

Monday, June 27, 2011

And the winner is....


Congrats Jana!!! I think I still have your address so I'll get these sent out to you!  


Edit: Hmm...not sure why it didn't post the result, but it was 3...

Friday, June 24, 2011

Jumpin' June Bug Blog Hop

Welcome to my post for the Jumpin' June Bug Blog Hop! If you are here from Planlady19  you are in the right spot. If this is your first stop, head back over to My Little Corner to start from the beginning.

For my project I decided to make some indoor smores since it's been rainy here lately and we haven't had a chance to have many outside. I'll walk through the steps and post the full recipe at the end so you can just copy and paste if you want to print it.

The first thing I do is get the pan ready. This is probably the most important step in the whole process. It seems silly until you are trying to get your sticky marshmallow mess out of the pan...You'll want to rub the inside of the pan with vegetable oil. A lot of vegetable oil. All over the inside of the pan. To the point where you look at it and wonder if you should have used that much oil. Then, when you think you can't get any more oil inside the pan, coat it in powdered sugar. I've found the easiest way to get powdered sugar on the side of the pan is to pour the powdered sugar in the pan, cover with tin foil and shake the pan until it's good and coated. If you have a silicone pan, use it. You'll want the pan to look like this:


Then when that's all ready you can start getting the ingredients mixed together. I didn't really take any pictures of this because it's not all that exciting. I put my water and gelatin in my mixer bowl to set up while the sugar, corn syrup, salt and water boil together. Then when everything is all ready, you start your mixer on low and sloooooowly pour the sugar mixture into the gelatin. When it's all in, start increasing your mixer speed until you are on high. It will start to fluff up and look all marsmallowy after just a minute or two:


You'll want to keep mixing it until it's very stiff. The recipe says about 12 minutes, but I usually mix for about 15 or so. (And trust me, use a stand mixer. If you just have a hand mixer, borrow one from a neighbor or this isn't the project for you). When it's ready, pour it into a pan and let it sit for at least 3 hours. Overnight is better.


When it's ready, coat the top with powdered sugar (and leave it handy). This will help it not stick to everything in creation. Then, get some parchment paper or waxed paper and line your work surface with it. Then dump the pan upside down. If the pan was coated well enough the marshmallows will fall out. If you're like me, you'll have to run a knife around the edges to get it started. If that doesn't work, you get to put your hand in the edge and gently pull the marshmallows out. And I'll warn you right now that the bottom never looks as pretty as the top.

When you have them out of the pan, coat the sides and top with powdered sugar and cut into cubes. A knife works, but a pizza cutter works better. If you coat whatever you're using to cut with vegetable oil it will resist getting sticky for a little bit, but I won't lie - it's gonna get sticky. When you have your cubes, coat all sides with powdered sugar so they don't stick together again after you cut them. I coat them as I go to make life easier.


Then, just to make them tastier, dip them in dipping chocolate and roll them in crushed graham crackers. (I use the Candy Melts from Hobby Lobby because they are a ton cheaper than buying Baker's Dipping Chocolate from the grocery store). Yumm-o! I keep mine in the fridge just so the chocolate is nice and crunchy.


Then, just because I love my neighbors, I packaged some up just for them. And I even made an extra one to give to a lucky reader.


 BLOG CANDY: If you want to be entered to win a yummy box of homemade s'mores, just follow this blog and leave a comment below. I will pick a winner on Sunday evening.

Thanks for checking out my project! Now, head on down the blog trail! Next stop: DGirlLV
Here's a list of the whole blog hop:

JulieClawser - My Little Corner
Heart2Hand - Heart2Hands Highlights
Planlady19 - Planlady19
CindyAdamson - My Lazy Crafternoon <------------------------You Are Here
DGirlLV - DGirlLV
Caitlynsmommy - Crafting for Caitlyn
Doodles - Doodles Scraps
GrandmaJ - My Little Craftin' Corner
Skrappindiva - Skrappin Diva
AmyMLT - Cove of Creativity
LEIALOHA - Divine Scrapper
J_Bear - JBear's Home
Heaven4333 - Heaven's Creations
Scrappin_RN - Cuttin' Up
JanaZ - Simply My Crafts


Full recipe:
3 cups granulated sugar
1 1/4 cups light corn syrup
1/4 teaspoon salt
1 1/2 cups water
4 envelopes unflavored gelatin
2 teaspoons pure vanilla extract
2 pounds dipping chocolate
1 box graham crackers, crushed
powdered sugar for dusting
vegetable oil for brushing

Prepare pan with vegetable oil then coat with powdered sugar. Set aside. Put granulated sugar, corn syrup, salt, and 3/4 cup water into saucepan. Bring to a boil, stirring to dissolve sugar. Then cook without stirring until it reaches 238 degrees with a candy thermometer.
Meanwhile, put remaining 3/4 cup water into a mixer bowl and sprinkle with gelatin. Let set for 5 minutes.
When syrup is ready, move bowl with gelatin to mixer. Start on low speed and slowly beat syrup into the gelatin. Gradually raise the mixer speed to high and beat until it is stiff - about 12-15 minutes. Add vanilla.
Pour into prepared pan and let stand for at least 3 hours until firm
Sift top with powdered sugar and flip marshmallows out of the pan onto a prepared work surface. Cut marshmallows into squares and coat all sides with powdered sugar.
Melt dipping chocolate according to package instructions and coat marshmallows in chocolate and then immediately roll in crushed graham crackers.
Place on waxed paper or parchment paper to dry. Store in an airtight container.

Thursday, June 2, 2011

Altered paint can and paint stick

You all know how I love the swaps over at the CMB. This post is no exception. I joined a paint can swap. You can find plain old empty paint cans at pretty much any hardware store. They also have them at Michaels, but I like the metal ones at the hardware store better than the plastic ones at Michaels. Just my preference. 
Anyway, these are super easy and super fun to make. Just take your favorite paper and cover the paint can with it. I know others use Tacky Tape or their ATG gun, but I like Mod Podge because I seem to be able to get the paper to lay nicer with that than with other adhesives. When that's dry, I add another layer of Mod Podge on top to "seal" it in. Then I add embellishments on top. 
Here's what I made for SweetCreations:

The front

The back

Different angle of the back

The lid

And because you always get paint sticks when you get a paint can, I had to do something with that too!

The front

The back. With extra little tags.

Wednesday, May 25, 2011

Mini notebooks

I recently went on a mini notebook making binge. They're fun, easy, super cute and make perfect little gifts. What's not to like??


Monday, May 9, 2011

Blog Award!

I'm a bit humbled to find out that I got my first blog award - from someone who's work amazes me no less. Thank you so much to Kim at Little Red's Craftin' Hood! Go check out her work. It's amazing!


To receive this award the rules to be followed are:
Step 1 - Make a post linking back to the person who gave you the award.
Step 2 - Share 8 random things about you.
Step 3 – Award 8 recently discovered bloggers with this award.
Step 4 – Contact these bloggers and tell them they have won the award.


8 Random Things About Me

1) I separate my M&Ms and Skittles by color before I can eat them, then I eat them according to how many of each color there are.
2) I graduated in a class of 36 and could probably still name all of my classmates.
3) I learned to drive when I was 12 in a Ford F350 (stick shift of course) so that I could pick my dad up in the field and help out on the farm
4) When I was 15 I joined the local ambulance service and became the youngest EMT ever on the squad
5) I've been a labor and delivery nurse for 6 years
6) I practically grew up in a craft store. My mom owned a small store until I was 6 and then most of the craft supplies came home with us when she closed the store. It was awesome. :-)
7) If it were up to me, I wouldn't live anywhere that it snows.
8) I'm allergic to floral scents and can't even walk down the detergent aisle in the store without getting a headache.


Here are the awesomely talented ladies I decided to share this with:
Liz - Liz's scrap corner
Helen - Scrap a little

Sunday, May 1, 2011

Happy May Day!

Here are a couple pics of the May Day flower pots I made for our neighbors. I'll post a tutorial on the flowers soon. Enjoy!


Tuesday, April 26, 2011

Altered binder clips

I figured I'd share some cute little altered binder clips I made. Don't they look like little purses??

These are super simple to make, just add paper to the binder clips by either using Glossy Accents, ATG or Mod Podge and then add embellies.

Tuesday, April 19, 2011

Mini Clipboards

I decided to try my hand at making post it note clipboards. I can see how these would be addictive!

For the back, I started with coasters - the cardboardy kind you get at restaurants or you can get them in the dollar section of Michaels. Then I covered both sides with Mod Podge and paper. Take the backing off the post its and stick that on, then add a binder clip and voila!

What a super cute little gift idea!


(The back)

Monday, April 18, 2011

Blog Candy Winner!

I just went to random.org to find a Blog Candy winner. And the winner is....

ScrappinMT (aka Donna)

Congrats!!!

Friday, April 15, 2011

Bashful Bunny Blog Hop! - Tie Dyed Eggs

Over at the CMB one of the swaps I'm in is a secret sister "Bashful Bunny Swap." In the course of getting to know each other through 2 swaps now we decided to do a blog hop with Easter projects. If you came here from Scrap Occurs, you are in the right spot! If you came to my page and have no idea what I'm talking about, start here. There are lots of wonderful projects and even some Blog Candy on many blogs (including here!).

On to the project! I got this idea from one of my favorite sites. It is the coolest (and super easy!) way to dye eggs. One of the reasons I love it because my 2 year old can help and we don't have egg dye all over the table, chairs, floor, clothes, etc...Here we go:

First off, you'll need eggs (do I really even need to say that?) and silk ties. Yes, ties. Men's silk neck ties. You can get them for about $1 at Savers, GoodWill, Salvation Army or wherever. If the hubby has some ugly ones, just grab those  ask if he minds that you use them. Just make sure that they are 100% silk (there should be a tag and surprisingly, most ties are silk) - other fabrics don't give up their color as well. 

Once you have your ties, cut the seam in the back and pull out the white interfacing stuff. This is the most tedious part. Especially if you are like me and decided that if 10 ties is good, 30 is better... 

A pile of my ties all cut up

Once you have all your ties cut up, wrap them around your eggs. You'll want the "right" side toward the egg (the side that was showing when your ties were still ties and not just a pile of fabric). Get the fabric nice and tight around the egg so you don't have many gaps. If the fabric isn't touching the egg, the color won't transfer. You can secure the fabric around the egg with string or even just a twist tie.

Seriously. How cute is this??

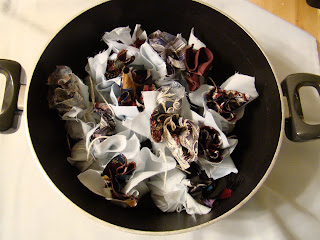
 After that, you'll want to cover them in a light colored cotton fabric. (I just cut up an old pillowcase and used that). Then put them in a large pot, cover the eggs with water. Then comes the magic - add 1/4 cup vinegar and boil for 20 minutes. This will both hard boil your eggs and dye them at the same time.

I have to say it's a little weird putting fabric on the stove...
 Then when they are all done, you get to unwrap them like little presents (after they cool of course - not that I would have tried before that or anything...) and this is what you get:


Here are some pics of the eggs on top of the tie they were wrapped in. How you wrap it will depend on where you get the "bunched" pattern.

This one didn't turn out as cool as I thought it would.

I thought this one was cool because I didn't even notice
the texture of the tie until it was on the egg

My favorite one. This was the "bunched" side (where the tie was tied)

This was the other side of the above egg. 


Another one I thought would be better. Still neat looking though.
The white splotches are a good example of what happens if the fabric isn't
tight around the egg.


All together in a cute basket!
You can also blow out the eggs before you boil them so they last longer. But since they'll float when you boil them you just need to put a colander on top to keep them in the water. If you make them this way then you can do stuff like make cute ornaments out of them and hang them from an easter tree. 

Now for the blog candy! If you want to be entered for the blog candy, all you have to do is leave a comment below. For another entry, follow this blog and leave a comment saying you are a follower. And, lastly, if you are one of my fellow Bashful Bunnies, add a comment below saying that for a third entry.  Here is a pic of what you can win:

2 packs of Cosmo Cricket Tiny Type and 1
pad of Studio 112 tags

Keep on hopping on the bunny blog trail! Off to Two Hands Creating!

Here's the full list: 
Terri - Planlady19
Cammi - Cuttin-Up
Lisa - Cuttle Fairies Express
Janice - My Little Craftin Corner
Elia - DivineScrapper
Sheri - Somewhere Over the Rainbow
Amy - Cove of Creativity
DeeAnn - Scrap Occurs
Cindy - My Lazy Crafternoon <--------You are here!--------
Heather - Two Hands Creating
Heather - Paper Crafter’s Anonymous
Jana - ~Simply My Crafts~